Clarified Milk Punch · Volume 4
Vol 4 — The Method
Mixed Drinks — Clarified Milk Punch. The sequence from start to bottle, the ratios that actually matter, where the time goes, what yield to expect, and the five ways it goes wrong.
4.1.1 The shape of the thing
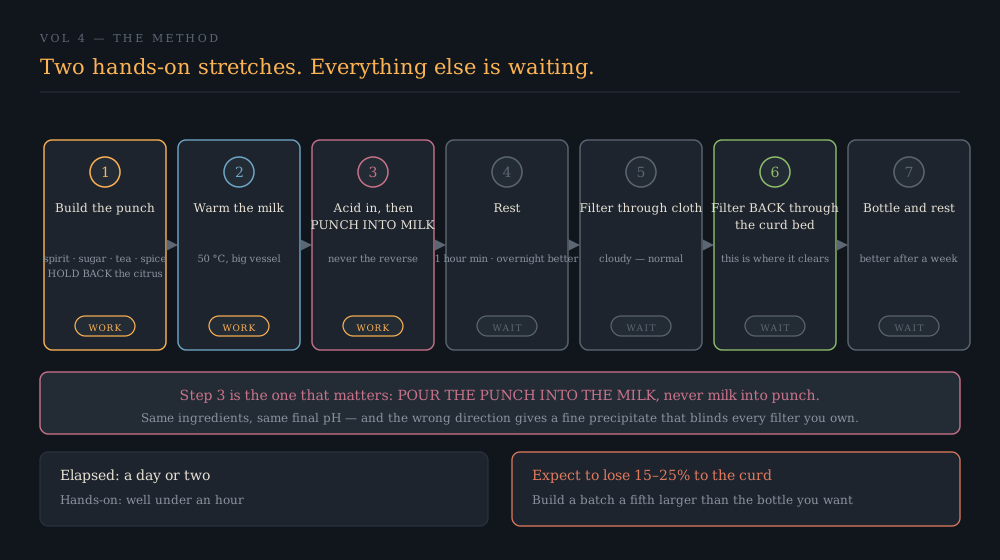
Six steps. Two of them are work; the rest is waiting.
- Build the punch — spirit, sugar, citrus, tea and spice, but hold the citrus back.
- Warm the milk in a vessel large enough for everything.
- Add the acid to the punch, then pour the punch into the milk.
- Let it curdle and settle — an hour minimum, overnight is better.
- Filter, slowly, and then filter again through the bed you have built.
- Bottle and rest. It is better after a week than on the day.
⚠ Total elapsed time is a day or two; total hands-on time is well under an hour. Almost everything in this recipe is the liquid working without you, which is what made it a household preparation rather than a bar technique.
4.1.2 A working ratio
Proportions vary widely across the historical and modern record. This is a middle-of-the-road starting point, given by volume, for roughly a 750 ml finished bottle.
Table 1 — A working ratio
| Component | Quantity | Job |
|---|---|---|
| Spirit | 750 ml | The drink. 40% ABV or higher (Vol 7 explains why) |
| Water or brewed tea | 500 ml | Length, and tannin if it is tea |
| Sugar | 200–300 g | Body and balance; also helps it keep |
| Citrus juice | 250 ml | The acid that drives the whole reaction |
| Citrus peel | from 4–6 fruit | Oleo saccharum, made first |
| Whole milk | 300–350 ml | The filter |
| Spice | to taste | Aroma |
The one ratio that is not negotiable is the milk. Rules of thumb put it at roughly one part milk to four to six parts total liquid. Too little and there is not enough curd to catch everything, so the punch stays hazy. Too much and you waste yield and strip more flavour than you meant to.
⭐ There must be enough acid to take the whole batch below pH 4.6 (Vol 3). That is the actual requirement — the citrus quantity above is a proxy for it. A pH strip or a cheap meter turns the most uncertain step in the recipe into a measurement, and it is the single best piece of kit to add.
4.1.3 Step by step
4.1.3.1 — Oleo saccharum first
Peel the citrus in wide strips with as little pith as possible, toss with the sugar, seal, and leave several hours or overnight. The sugar draws the oil out of the peel and dissolves in it.
This is the same technique the Old Fashioned dive covers in Vol 3, and it is more important here than there: it is where most of the citrus aroma in the finished punch comes from, and aroma is what survives clarification best.
4.1.3.2 — Build the punch, without the acid
Spirit, the oleo saccharum and its sugar, brewed tea or water, and any spices. Stir until the sugar has dissolved completely. Leave the citrus juice out for now — there is no reason for the acid to be sitting in the punch any longer than it has to.
4.1.3.3 — Warm the milk
Whole milk into a large vessel — it must hold the milk plus the entire punch with headroom. Warm it to somewhere around body temperature to 60 °C. Do not boil it unless you are deliberately following an 18th-century method; scorched milk is a flavour that survives filtration.
4.1.3.4 — Acid in, then punch into milk
Add the citrus juice to the punch and stir. Then, slowly and steadily, pour the punch into the milk.
🔴 This direction is the most important instruction in the dive. Punch into milk, never milk into punch — Vol 3 explains why in full, and the short version is that the wrong direction gives you a fine precipitate that will blind every filter you own.
It will curdle immediately and dramatically. That is correct. Do not stir it after this point beyond a single gentle turn; agitation breaks the curd into smaller pieces and makes filtering worse.
4.1.3.5 — Rest
One hour minimum. Overnight in the fridge is better. The curd knits and settles, and the longer it sits the cleaner the separation. This is free improvement and there is no reason to rush it.
4.1.3.6 — First filtration
Line a sieve with damp cheesecloth — several layers, or a jelly bag, or a fine nut-milk bag — and set it over a bowl. Pour the whole thing through, curds included, and let gravity do it.
⚠ Do not squeeze the bag. Squeezing forces fine solids straight through and undoes the work. If it is slow, it is working.
The first run-through will be cloudy. That is expected and it is not a failure.
4.1.3.7 — Second filtration, through the bed
Pour the cloudy liquid back through the same curds. This is the step most write-ups leave out and it is where clarity actually arrives.
⭐ The curd bed IS the filter. The cloth only holds it in place. Passing the liquid back through the settled solids is depth filtration in the proper sense, and it typically takes a punch from hazy to genuinely transparent. Repeat a third time if it is still not clear. Some batches want a coffee filter for a final polish; that is slow and worth it.
4.1.3.8 — Bottle and rest
Into clean bottles, sealed, refrigerated (Vol 7). It improves for the first week or two as the flavours settle. It is drinkable immediately and better later.
4.1.4 Yield, and the disappointment nobody warns you about
⚠ Expect to lose 15–25% of your volume to the curd. A batch built from 1.8 litres of liquid will not give 1.8 litres of punch — the solids retain a meaningful amount, and squeezing them (see above) is not the answer.
Plan for it. Build a batch a fifth larger than the bottle you want to fill. This is the most common surprise in a first attempt and it has nothing to do with technique.
4.1.5 The five failures
Table 2 — The five failures
| Symptom | Cause | Fix |
|---|---|---|
| Never curdled | Not enough acid; pH never reached 4.6 | Add more citrus. Measure next time |
| Fine haze that will not clear | Milk poured into punch, or the curd was stirred | Re-filter through the bed; next time, mind the direction |
| Filter blinded, nothing draining | Fine precipitate, or the bag was squeezed | Start a fresh cloth; let gravity work |
| Tastes thin and washed out | Too much milk, or over-filtered | Less milk; build the punch stronger to begin with |
| Cooked or scalded note | Milk boiled too hard | Warm, don’t boil |
⭐ A hazy punch is a cosmetic failure, not a spoiled one. It tastes almost identical. If it will not clear and you have run out of patience, drink it cloudy — the clarification has still done its work on the tannins.
4.1.6 What to expect the first time
It will look wrong before it looks right. The curdle is alarming, the first filtration is cloudy, and the whole thing appears to be a disaster for about the first two hours. Then it clears, and the result is transparent, silky and unlike anything else — which is why the technique survived two hundred years of people trying it for the first time and nearly giving up in the middle.
Vol 10 lays out a specific first batch to build.
4.1.7 Sources and further reading
- David Wondrich, Punch (2010) — historical methods and proportions.
- Dave Arnold, Liquid Intelligence (2014) — clarification technique and the physics of filtration.
- Vol 3 for why the direction of pouring matters; Vol 6 for filtration in detail; Vol 7 for storage.
Comments (0)